secure your apps and your cluster with anthos service mesh
Even if I already covered how to protect your service mesh with an HTTPS GCLB and Cloud Armor, I thought I will describe in more details what are your other options to protect your workloads on GKE thanks to Anthos Service Mesh (ASM) and Istio.
Here are 7 easy steps to accomplish this:
- Install ASM on your cluster
- Enable ASM for your apps
- Enable mTLS
STRICTfor your apps - Configure a
Sidecarfor your mesh - Define
AuthorizationPoliciesfor your apps - Leverage an HTTPS GCLB and Cloud Armor in front of your
IngressGateway - Complementary considerations
Let’s see those in actions.
Install ASM
Anthos Service Mesh has a suite of features and tools that help you observe and manage secure, reliable services in a unified way.
curl https://storage.googleapis.com/csm-artifacts/asm/asmcli_1.12 > ~/asmcli
chmod +x ~/asmcli
cat <<EOF > ditroless-proxy.yaml
---
apiVersion: install.istio.io/v1alpha1
kind: IstioOperator
spec:
  meshConfig:
    defaultConfig:
      image:
        imageType: distroless
EOF
~/asmcli install \
    --project_id $projectId \
    --cluster_name $clusterName \
    --cluster_location $zone \
    --enable-all \
    --option cni-gcp \
    --custom_overlay distroless-proxy.yaml
Using --custom_overlay distroless-proxy.yaml to define meshConfig.defaultConfig.image.imageType: distroless is new since ASM 1.12. The distroless base image ensures that the proxy image contains the minimal number of packages required to run the proxy. This improves security posture by reducing the overall attack surface of the image.
Using --option cni-gcp is giving you more security because the Istio CNI plugin replaces the functionality provided by the istio-init container (which has elevated permissions).
Enable ASM
In order to take advantage of all of ASM/Istio’s features, pods in the mesh must be running an ASM sidecar proxy.
namespace=onlineboutique
asmRevision=$(kubectl get deploy -n istio-system -l app=istiod -o jsonpath={.items[*].metadata.labels.'istio\.io\/rev'}'{"\n"}')
kubectl label namespace $namespace \
    istio-injection- istio.io/rev=$asmRevision \
    --overwrite
To actually inject the sidecar proxy, we need to force a deployment of your apps on this specific namespace:
kubectl rollout restart deployments -n $namespace
Enable mTLS STRICT
Istio PeerAuthentication defines how traffic will be tunneled (or not) to the sidecar.
cat <<EOF | kubectl apply -n $namespace -f -
apiVersion: security.istio.io/v1beta1
kind: PeerAuthentication
metadata:
 name: default
spec:
 mtls:
   mode: STRICT
EOF
Configure a Sidecar
Istio Sidecar describes the configuration of the sidecar proxy that mediates inbound and outbound communication to the workload instance it is attached to. This feature is quite easy to configure and has two large benefits: Security and Performance. I explain this in more details here.
cat <<EOF | kubectl apply -n istio-system -f -
apiVersion: networking.istio.io/v1beta1
kind: Sidecar
metadata:
  name: default
spec:
  egress:
  - hosts:
    - "./*"
    - "istio-system/*"
EOF
Define AuthorizationPolicies
Istio AuthorizationPolicy enables access control on workloads in the mesh.
First, we need to deny all the ingress traffic to any pod in that namespace:
cat <<EOF | kubectl apply -n $namespace -f -
apiVersion: security.istio.io/v1beta1
kind: AuthorizationPolicy
metadata:
  name: deny-all
spec:
  {}
EOF
Then, we need to granularly give access to certain pods to communicate between each others, only where needed. The following example gives both frontend and checkoutservice to reach out to cartservice only on specific operations:
cat <<EOF | kubectl apply -n $namespace -f -
apiVersion: security.istio.io/v1beta1
kind: AuthorizationPolicy
metadata:
  name: cartservice
spec:
  selector:
    matchLabels:
      app: cartservice
  rules:
  - from:
    - source:
        principals: ["cluster.local/ns/onlineboutique/sa/frontend", "cluster.local/ns/onlineboutique/sa/checkoutservice"]
    to:
      - operation:
          paths: ["/hipstershop.CartService/AddItem", "/hipstershop.CartService/GetCart", "/hipstershop.CartService/EmptyCart"]
          methods: ["POST"]
EOF
You could see that we identify the sources with a specific ServiceAccount for each pod/app. You could find other AuthorizationPolicy and ServiceAccount definitions for each app of the OnlineBoutique in there.
Leverage an HTTPS GCLB and Cloud Armor in front of your IngressGateway
To start let’s create a Cloud Armor policy:
policyName=asm-ingressgateway
gcloud compute security-policies create $policyName \
    --description "Block XSS attacks"
gcloud compute security-policies rules create 1000 \
    --security-policy $policyName \
    --expression "evaluatePreconfiguredExpr('xss-stable')" \
    --action "deny-403" \
    --description "XSS attack filtering"
Then, let’s create a public static IP address:
ipName=asm-ingressgateway
gcloud compute addresses create $ipName --global
ipAddress=$(gcloud compute addresses describe $ipName --global --format=json | jq -r '.address')
echo $ipAddress
From here, you could bring your own DNS and set the IP address provisioned previously, or as an example you could run the following commands to get a DNS from Cloud Endpoint:
projectId=FIXME
hostName=onlineboutique.endpoints.$projectId.cloud.goog
cat <<EOF > dns-spec.yaml
swagger: "2.0"
info:
  description: "Cloud Endpoints DNS"
  title: "Cloud Endpoints DNS"
  version: "1.0.0"
paths: {}
host: "${hostName}"
x-google-endpoints:
- name: "${hostName}"
  target: "${ipAddress}"
EOF
gcloud endpoints services deploy dns-spec.yaml
With that, we could now deploy our Kubernetes manifest containing all the object needed to deploy our ingress gateway (Deployment, Service, Ingress, BackendConfig, ManagedCertificate and Gateway):
ingressNamespace=asm-ingress
kubectl create ns $ingressNamespace
kubectl label namespace $ingressNamespace istio-injection- istio.io/rev=$asmRevision --overwrite
curl https://gist.githubusercontent.com/mathieu-benoit/19c020c9a1cbe19e0541316502358f91/raw/9481474a45b12b14c9b21403e0d472140b5cd448/asm-ingress.yaml > asm-ingress.yaml
sed -i "s,SECURITY_POLICY,${policyName},g;s,HOST_NAME,${hostName},g;s,IP_NAME,${ipName},g" asm-ingress.yaml
kubectl apply -n $ingressNamespace -f asm-ingress.yaml
Note: Gateways are generally owned by the platform admins or network admins team. Therefore, the shared Gateway resource is created in the asm-ingress namespace owned by the platform admin.
Finally, we need to apply a VirtualService configuration to the asm-ingressgateway proxy to manage inbound traffic for the OnlineBoutique’s frontend service:
cat <<EOF | kubectl apply -n $namespace -f -
apiVersion: networking.istio.io/v1alpha3
kind: VirtualService
metadata:
  name: frontend
spec:
  hosts:
  - "${hostName}"
  gateways:
  - frontend
  http:
  - route:
    - destination:
        host: frontend
        port:
          number: 80
EOF
Note: The VirtualService is created in the application namespace. Typically, the application owner decides and configures how and what traffic gets routed to the application so VirtualService is deployed by the app owner.
After waiting for a couple of minutes, all the infrastructure will be provisioned and you should be able to successfully reach your DNS (i.e. https://$hostName), on a secure manner ;)
Note: there is two other scenario you could leverage by exposing your IngressGateway, either via an internal load balancer or even via a private service connect, if you don’t want to publicly expose your apps via the IngressGateway.
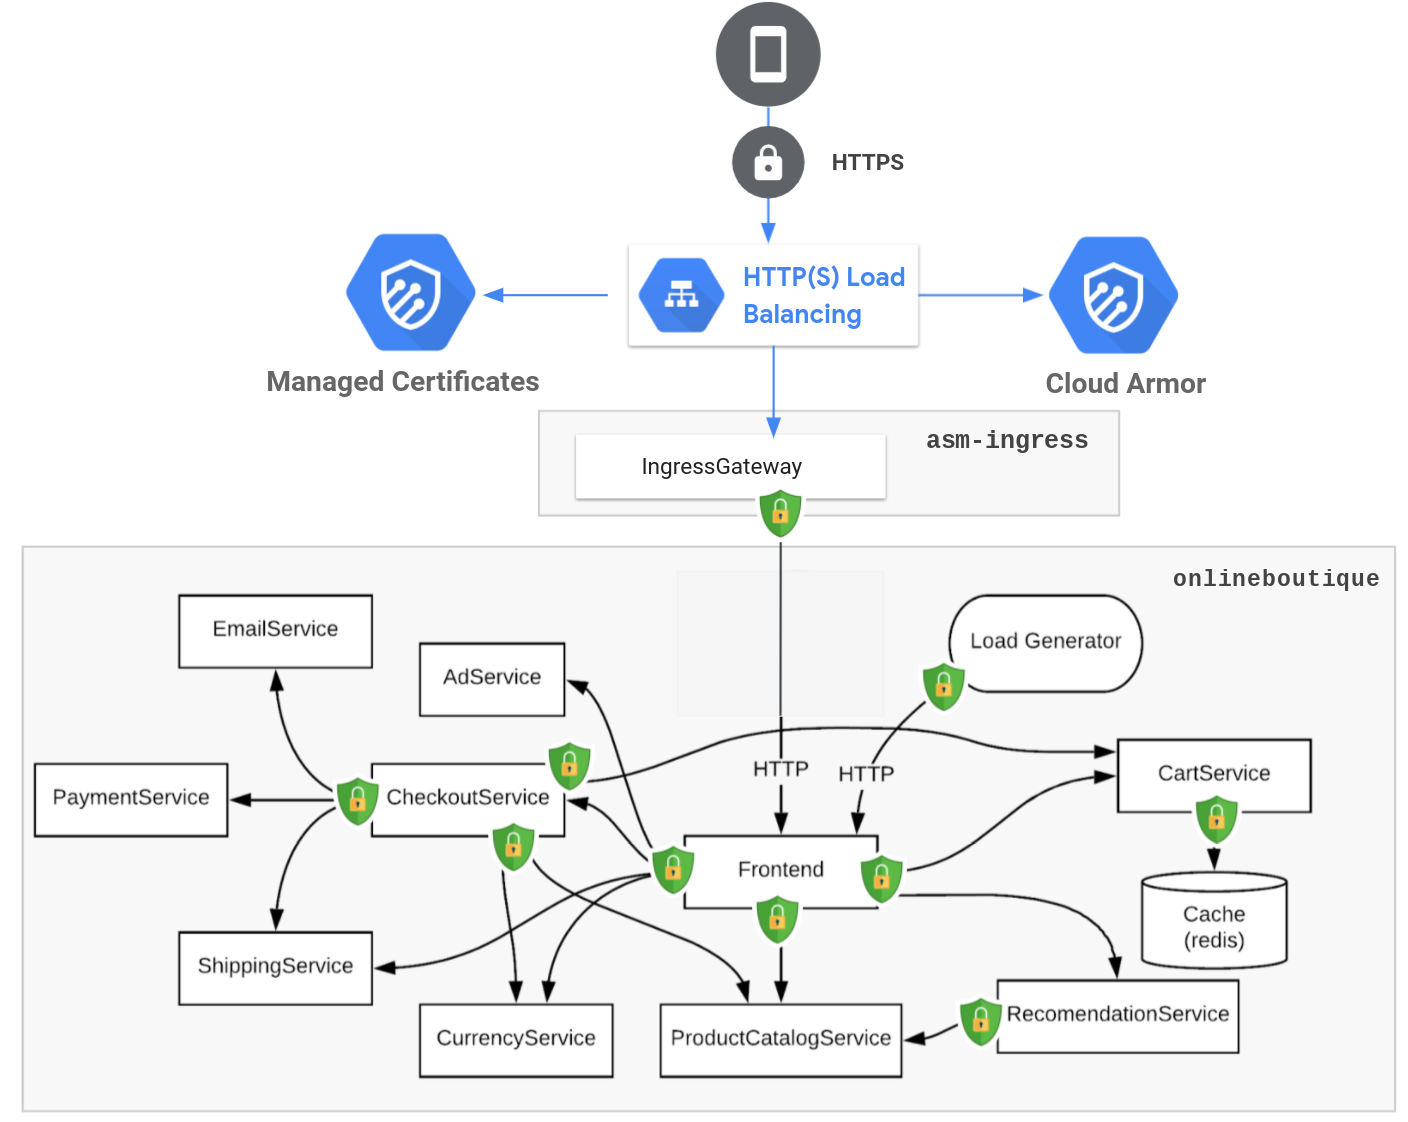
And voila, that’s a wrap!
Ultimately, here is the secure setup we have been describing with this blog article, the OnlineBoutique demo is now more secured. Hope you will be able to leverage this for your own apps/setup.
Complementary considerations
- Explore ASM in the Cloud Console (Topology, SLIs/SLOs, etc.)
- Configure OPA Gatekeeper policies with Policy Controller for more governance and security
- Configure Network Policies for a strong defense in depth strategy
Hope you enjoyed that one, stay safe out there! ;)